March 22, 2013

YAY for office shelves!

It took a while and a few trips to Ikea (which Emmy kept calling "Idea" when we visited this week), but we FINALLY purchased and installed shelves in our office. 

We went with dark brown to match the dark brown table tops and were hoping to go with this configuration from Ikea:
EKBY JÄRPEN/ EKBY BJÄRNUM from Ikea
Alas, the studs didn't line up in the right spots and my in-house handyman and anchoring/bolts expert did not recommend putting anything heavier than an apple on the shelves if we went with those brackets, so we improvised. The hubs headed out to Home Depot and got new brackets that we were able to anchor into the studs very easily - those shelves will NOT be coming down. EVER.

Here's the end result:

Although the brackets aren't what we had originally envisioned, we're happy with the end result. The shelves definitely help make the room feel close to finished and fill the giant white void that was there previously. 
I love me a shelf to display some cute things like a Lego piggy bank and these fun tupperware bins!
A clock is an essential piece of equipment in an office so you know if you're on schedule or not (I'm usually NOT) and who doesn't need an oversized pencil that actually writes with a giant piece of lead!??!!!

This guy is on the Hubby's side of the room. 
It feels great to have another room in the house close to complete. That said, we've definitely slowed down now that living here is the norm and every day commitments/appointments/needs/trials and tribulations have taken over instead of our main focus being decorating the house, as it was when we first moved here.

Slowly but surely though, this plain jane house with no personality is really becoming "ours" and we LOVE it.

March 14, 2013

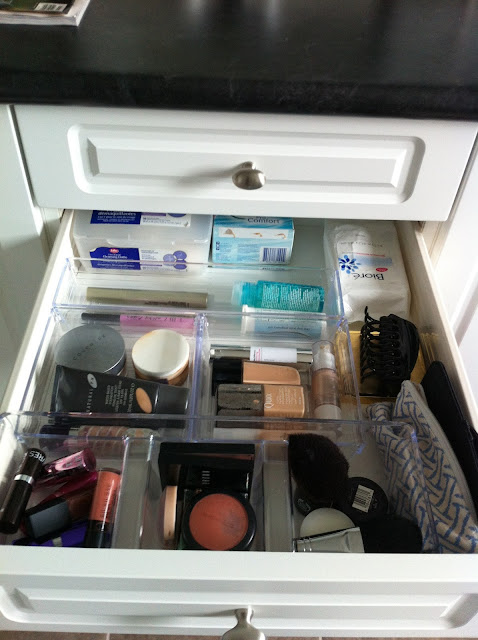
Cheap but cheerful organizing!

It's been a busy week and a bit filled with lots of adventure (day trips and Play Place trips), a few injuries (me at bootcamp) and one nasty cough (poor little Emmy), hence the lull in blogging on my behalf.

I did, however, manage to tackle an itty bitty bathroom organizing project. I made a trip to the Dollar Store and pick up a few drawer containers to help turn my mess of a vanity drawer into an organized delight! My grand total expenditure was $5 and my bag of Dollarama goodies included a dip tray from the home decor aisle along with clear containers in different shapes from the organizing aisle.

(Side Note: Am I the only one that gets a weird thrill out of repurposing an item for a something other than it was intended? Organizational dork here!!)

I really should have taken a "before" shot, but picture all of these items rolling around loosely in the drawer. It was madness.

I kept the organizing simple - like items got grouped together (e.g. lipsticks with lip glosses) for easy product selection. This little project is already saving me time (and reducing frustration and time wasted looking for something specific in the giant pile of products)!


March 3, 2013

Countdown to Three

For the most part, I feel that we escaped the "Terrible Two's". Don't get me wrong, Emmy had some pretty horrible meltdown moments of defiance and attitude and I've had to put her in "time-out" more times than I care to admit, but overall, I'd say that the last 340-ish days have been pretty wonderful. She's been a sweet, loving little two-year-old for the majority of the time.

That, however, has left us a little unprepared for what Grama refers to as "The Terrible Three's".

As we get closer and closer to Emmy's 3rd Birthday (on the 28th of this month), the more sass and attitude she seems to be pulling out, although I will say that the "bad" behaviour seems to come and go in waves. There will be a few weeks where she listens very well and shares without even being asked to and it's heavenly. Then we'll have a few weeks of Little Miss Sasspot who screams and fusses at the smallest thing (e.g. she can't get her toy to do what she wants, her shoe won't velcro properly, she drops something and can't pick it up).

I'm what I refer to as a "mean Mum" and I don't stand for the sassy behaviour and will reprimand her when appropriate (e.g. she knowingly did something that we've taught her is "bad" or not in line with how we expect her to act). Daddy doesn't stand for "bad girl" behaviour either. Or Grama. Or the teachers at school. Grampa is a big softie and Emmy has him wrapped around her finger and then some, so she gets away with a bit more with him.

I think we all need to up our game for the next 365 days however, to combat these "Terrible" Three's. Not to say that there won't be amazing moments, because there will be since overall, she's an AMAZING little creature who is figuring out who she is, and that's such an adventure. The things that come out of her mouth lately have us rolling on the floor in laughter, but I think those moments will be contrasted by even more heightened moments of defiance, tantrums and sass.

Bring it on Emmy - I can't wait to see how she grows while she's a three-year-old and we can't have amazing "ups" if we don't have "downs", so I'm ready for anything.

February 28, 2013

To paint or not to paint?

When we had the house painted before moving in this past fall, there were a few rooms we had to leave untouched in order to keep the painting budget reasonable (ha, yeah right...should have been a painter!)!

As the rest of the house gets decorated and has finishing touches added, those blank rooms feel so drastically different from the rest of the house, and it's becoming my mission to pick a colour for each room and either paint them myself or convince the hubby to put more cash in the painter's pockets.

They are currently both used as spare rooms for guests to sleep in, and each is outfitted with a bed and dresser/shelving unit..but not much else. If we decide to add another kiddo to this Sweet Little Lemon Life, then the closest room to the Master suite will become a nursery - something we are keeping in mind since we do NOT want to have to paint again for years (and years...and years).

So I've been grabbing paint chips and looking online for inspiration (thanks Pinterest!) and think I've narrowed it down to two colour options.

SPARE ROOM CLOSEST TO THE MASTER SUITE

This room gets so much natural light all day long, so I'm not afraid to go VERY dark in here and I'm leaning towards a royal blue that feels "inky". You know, like the colour of the ink that comes out of those 89 cent clear plastic pens with the navy blue lid we all used in grade school in the 80's. It's not a huge room - according to the builder's floor plan it's 10 x 10 feet with a 4.5 x 6 foot nook - so bedding, accessories, etc will need to be light and airy to balance out the dark walls and I think coral and teal accents would look amazing. I also feel confident that I can make this colour work if we are ever blessed with another child, be it a boy or a girl. Here's what it looks like today:

Standing in the doorway of the room, looking straight ahead into the nook.
Looking to the left, while standing in the doorway. The room has a regular sized closet and there is ample room for a dresser in that corner. 
A slim glass table is acting as a nightstand right now and fits between the bed and the wall. 
Standing in the nook looking straight out into the room and hallway.
And....dum dum dum dum....drumroll please, here are the paint chips I have taped to the wall:


SPARE BEDROOM AT THE FRONT OF THE HOUSE NEXT TO EMMY'S ROOM:

According to the ol' builder's website, this room is 10.5 x 12.5, but in reality I think it's likely closer to 10 x 11 feet (since there are slight differences in the layout of our house vs. the model/floorplan). This room get a lot of light until the early afternoon hours, since it's directly facing East - but when Mr. Sun starts his decent for the day it can get much darker in this room. Here's what it looks like today:

This photo is taken from the doorway looking to the right, into the room. Not shown in the picture is a wall-to-wall closet on the wall opposite the window wall. Currently it holds a whole lot of nothing.
Standing next to the closet, looking towards the wall opposite the bed. This Ikea Expidit can easily be transformed into a dresser, since you can buy drawer units to put into each of those cubbies - cool, eh?
 And, here is what I'm thinking for wall colour options:
I've never had a purple room before - in all the places we've lived, I think purple might be the one shade we've not chosen, so I'm ready to go for it!
Would love to hear YOUR thoughts about my current colour choices - do you love them? Hate them? Think I'm crazy? Well, you are right about me being crazy, but I'm ok with that. Hope to post an update before the snow melts that includes our newly painted spare rooms!

February 23, 2013

The Little Lemon Exhibit

I finally have another DIY project under my belt and it feels GOOD! 

There are two alcoves in our entry hallway, across from "the yellow room", that have been screaming at me to decorate/fill them in some way every time I walk past ("Fill me!!!! Fill me!"). I finally answered with a project that cost less than $40 total and allows us to showcase the original creations of our little artist in her first Art Exhibition (ha ha!)!

I've been eyeing square pieces of cork at Wal-Mart for months, but with their price tag ($12 for four 12x12 ish squares), creating anything more than a 8x8 grid was going to cost an arm and a leg. I visited my local Home Depot, but found that they don't sell cork that can be cut to any desired size like I thought they might.

Then, on a Thursday afternoon trip to Dollarama with my Dad (seriously, living here is the BEST), I found two-packs of cork tiles that are similar to the Wal-Mart square cork tiles for $2. I bought one pack and brought them home to get the Hubby's opinion of my idea.

What was my idea? I wanted to create a wall of cork tiles in one of the entryway alcoves so that we could hang pictures and showcase the little Lemon's artwork. He was on board and back I went to Dollarama to clean them out of cork tiles.

Here are the components of this project:

24 cork tiles and two packages of "mounting tape", also from Dollarama. I also grabbed a roll of tape from Home Depot in case the cheap stuff didn't work out (I always like to have a Plan B).

My next step was to figure out how to best adhere 24 of these suckers to the wall. I started out using the approach depicted in the photo below, but in the end added a piece of mounting tape to the middle and sides of each square as well. I also included a piece of the tape to tie the squares together. 


 It took about an hour to adhere all of the squares together. The trick was getting the first row level (much thanks to the Hubby and his trusty rusty level...and his quality control to ensure I'm DIYing with correct measurements), but once the first six squares were on the wall, it was easy going from there.

Here is the end result:

Here it is! The Little Lemon Exhibit in all its glory.
Now that other alcove is looking a lot more empty. That will have to be my next DIY project!
Here it is looking the other way, into the kitchen/great room. 
Isn't this cotton ball piece of art awesome? Love the things my girl creates!
More of Emmy's beautiful creations. 

I love it. I keep finding myself in front of it, looking at the drawings and paintings that Emmy created with her own two hands (ok, I also added one of my own too). Next year at Christmas, we will use the cork wall to display cards we receive and I can't wait for that! So happy with how this turned out!